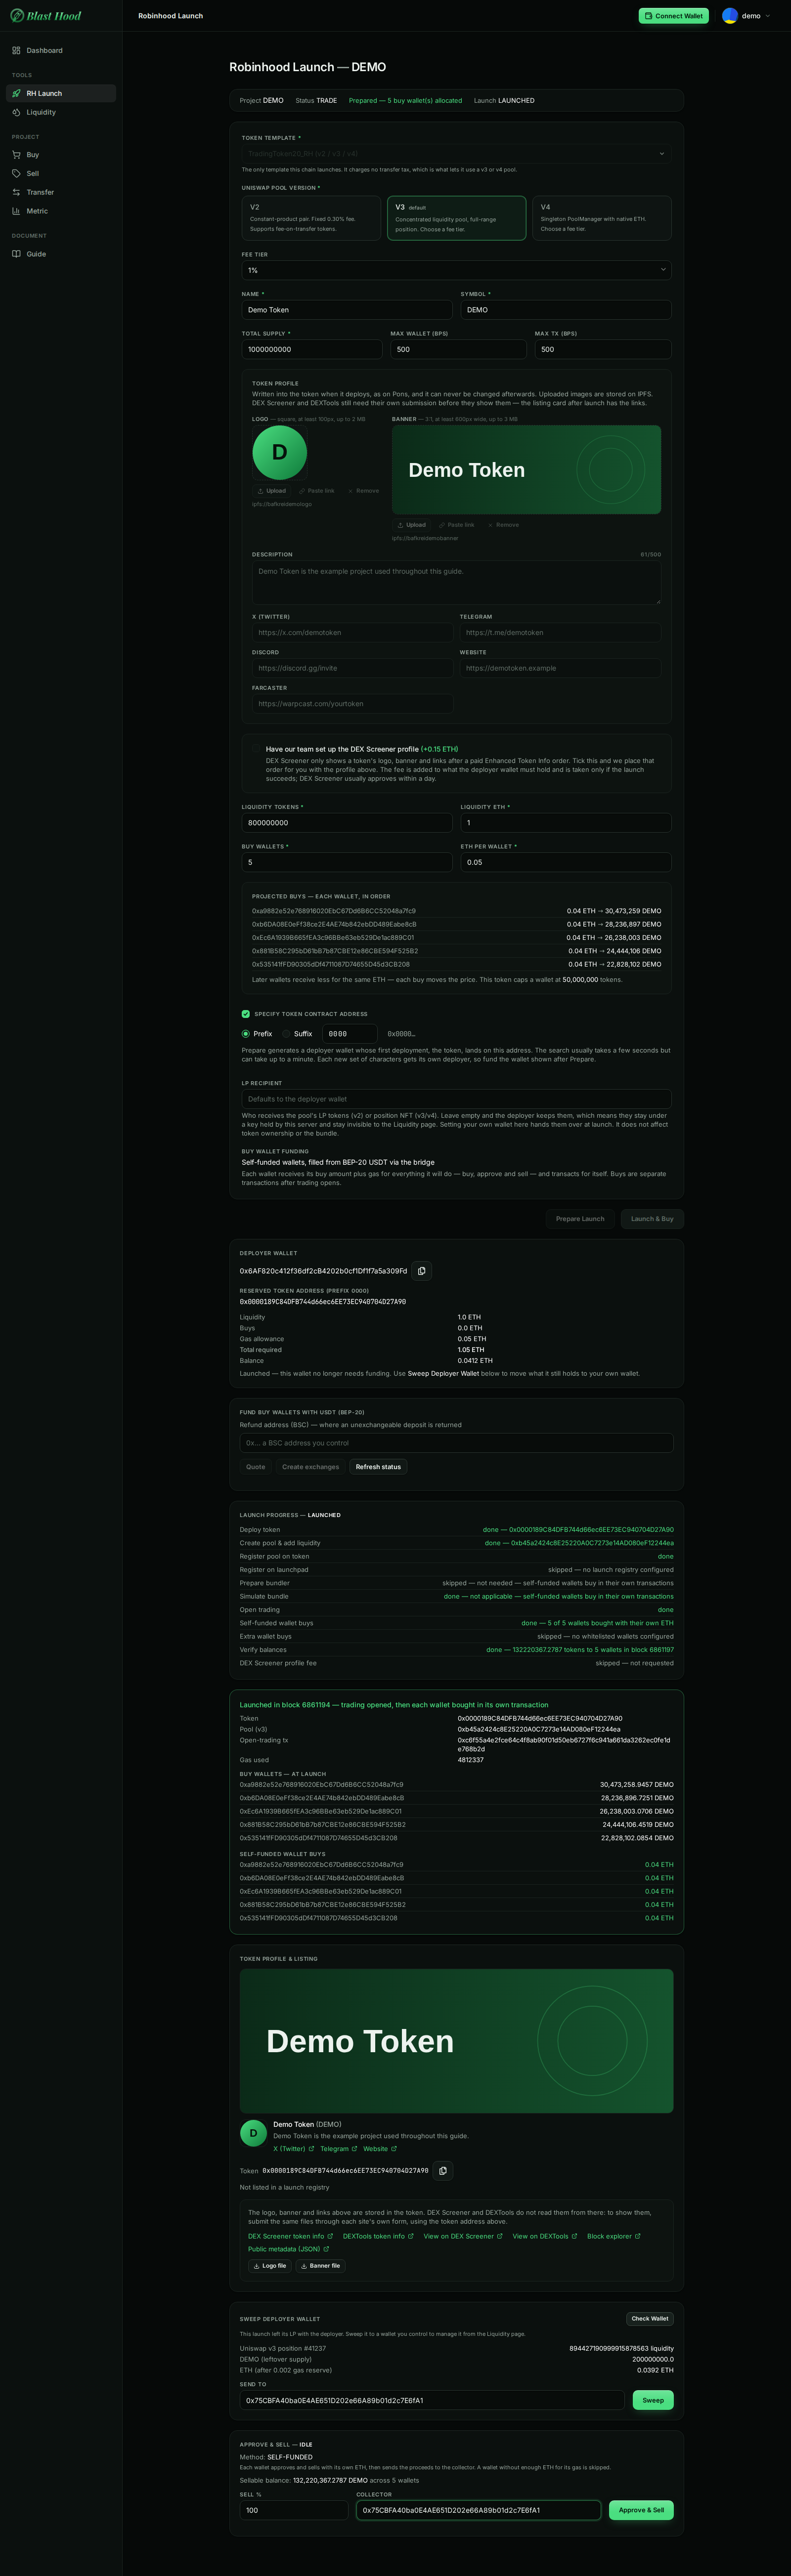
RH Launch · Robinhood Chain
Launching a token with RH Launch
Sidebar → Tools → RH Launch. Deploys the token, creates its Uniswap pool, adds liquidity and makes the first buys from a set of buy wallets, then lets you collect the LP and exit.
- Token
- Demo Token (DEMO)
- Total supply
- 1,000,000,000
- Pool
- Uniswap v3 · 1% fee
- Liquidity
- 800,000,000 DEMO + 1 ETH
- Buy wallets
- 5 × 0.05 ETH, self-funded
- Max wallet / tx
- 500 bps (5%)
Screenshots come from the current frontend running in a headless browser. The server, the chain and the browser wallet were simulated, so addresses and transaction hashes are placeholders. Token amounts were calculated from the pool above, so the numbers agree from page to page.
Launching, step by step
- Select the project on the Dashboard, then open RH Launch from the sidebar.
- Fill in the form: pool, token, profile, liquidity and buy wallets. Check the buys fit under the max-wallet cap.
- Press Prepare Launch. This creates the deployer wallet and the buy wallets and shows the projected buys.
- Send the Total required ETH to the deployer wallet on Robinhood Chain.
- Fund the buy wallets with USDT on BSC: enter a refund address, then Quote, Create exchanges, and pay every deposit address. Wait until all wallets show as funded.
- Press Launch & Buy and leave the page open until every step reports done.
- Press Check Wallet under Sweep Deployer Wallet, enter your own address and press Sweep. You now hold the LP position.
- When you want to exit, use Approve & Sell and enter your own wallet as the collector.
What to watch for
- Buys must fit under the max-wallet cap. The default cap is 200 bps (2% of supply). In the example, the first 0.04 ETH buy gets about 30.5M DEMO, which is over a 2% cap of 20M, so Prepare refuses it. The example raises both caps to 500 bps. Red rows under Projected buys mean a wallet is over the cap.
- Launch stays disabled until the deployer is funded. The button only checks the deployer's balance. The backend also refuses the launch if any buy wallet holds no ETH yet, so finish the USDT funding first.
- The buys follow the opening of trading. Self-funded wallets buy in their own transactions right after the Open trading step, so someone else can buy between them. Keep the max-wallet cap sensible.
- Leaving LP recipient empty leaves the LP on the server. The deployer is a key held by the server. Until you sweep it, the LP position can't be burned or locked from the Liquidity page.
- Token profile data can't be changed after launch. The logo, banner, description and links are written into the token when it deploys.
The page, top to bottom
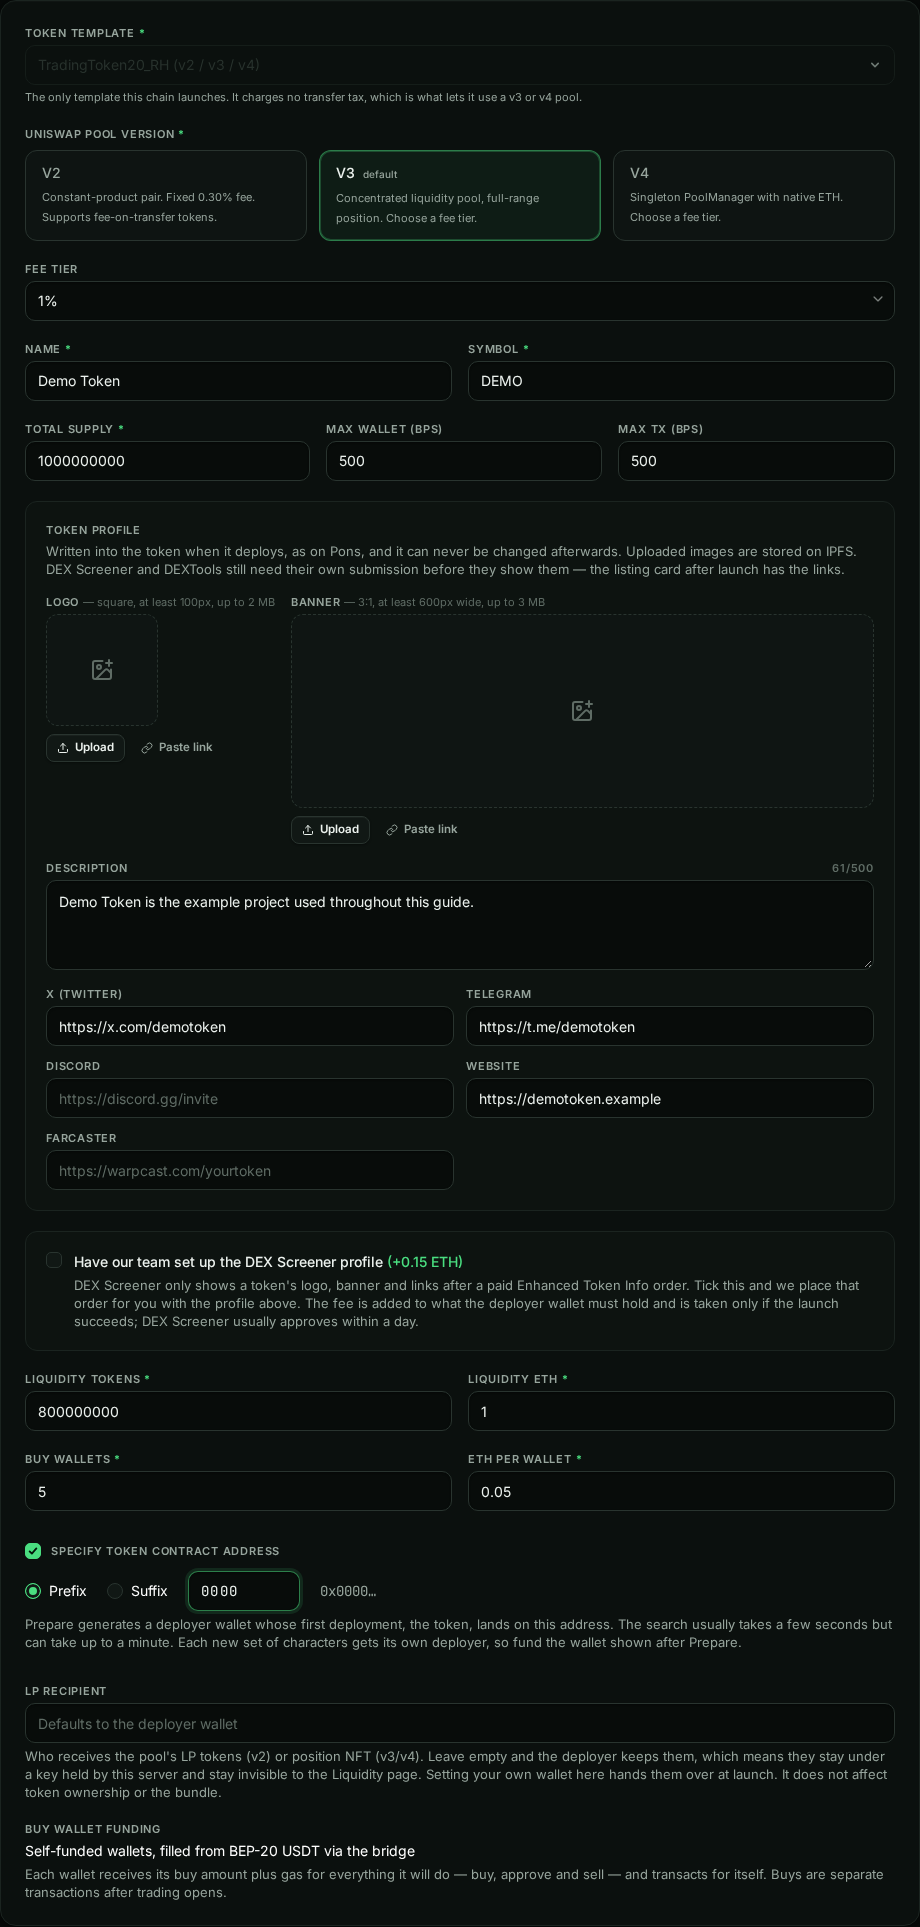
Launch form
Start hereEverything about the token and its pool is set here, before Prepare Launch.
- Token template: there is one,
TradingToken20_RH. It has no transfer tax, which is what lets it use a v3 or v4 pool. - Pool version: v3 is the default. v2 has a fixed 0.30% fee; v3 and v4 take the fee tier below (1% default).
- Max wallet / Max tx are in basis points of supply: 200 = 2%.
- Liquidity tokens / ETH go into the pool. Liquidity tokens can't exceed the supply; the rest of the supply stays with the deployer.
- Buy wallets × ETH per wallet: each wallet spends 80% of its ETH on the buy and keeps the rest for gas.
- LP recipient: leave it empty and the deployer keeps the LP. See the Sweep card below.
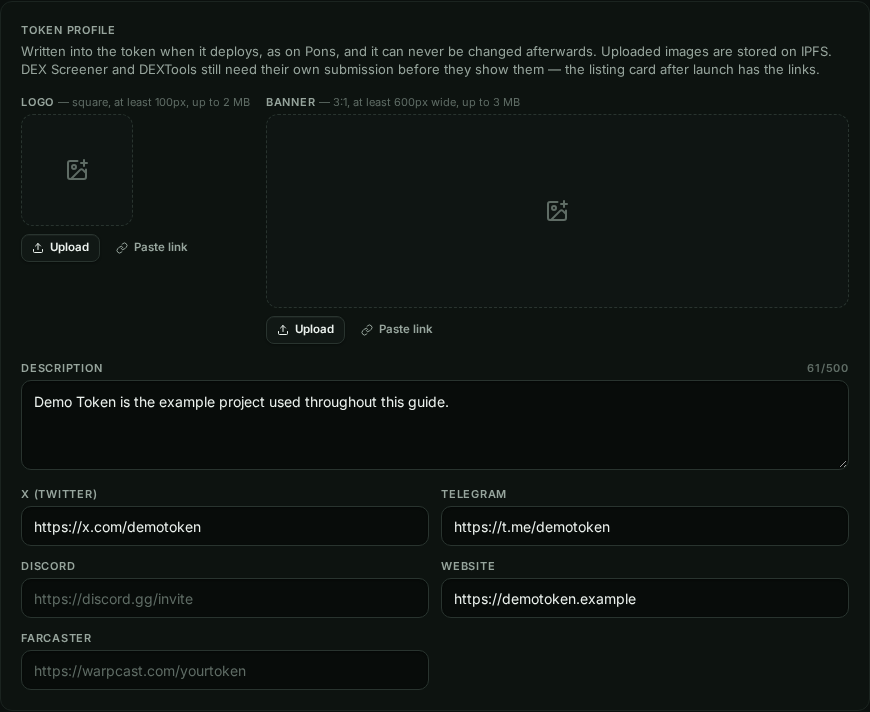

Token profile and DEX Screener
Can't be changed laterThe logo (square, at least 100 px, up to 2 MB), banner (3:1, at least 600 px wide, up to 3 MB), description and links are stored on IPFS and written into the token at deploy.
- DEX Screener and DEXTools don't read them from the token. They need their own submission; the listing card after launch links to both forms.
- Tick the add-on to have the team place the paid DEX Screener order for you. The fee is added to what the deployer must hold, and is only taken if the launch succeeds. It needs both a logo and a banner.

Custom token address
Tick Specify Token Contract Address to choose 4 hex characters at the start or end of the token's address.
- Prepare searches for a deployer wallet whose first deployment lands there; the button shows Finding Address…, which can take up to a minute.
- Each new pattern gets a new deployer, so fund the wallet shown after Prepare. If that deployer has already sent a transaction, the launch is refused and you have to prepare again.

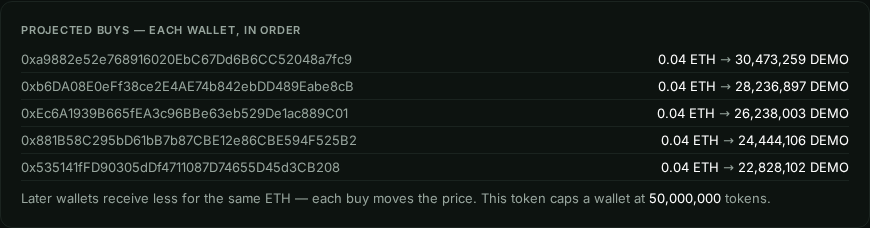
After Prepare Launch
PreparedThe banner switches from Not prepared to Prepared — 5 buy wallet(s) allocated, and the form gains Projected buys.
- Each row is one wallet, in buy order: ETH spent → tokens received. Later wallets get fewer tokens for the same ETH because every buy raises the price.
- A red row means that wallet would be over the max-wallet or max-tx cap. Lower its ETH or raise the cap and prepare again.
Deployer wallet
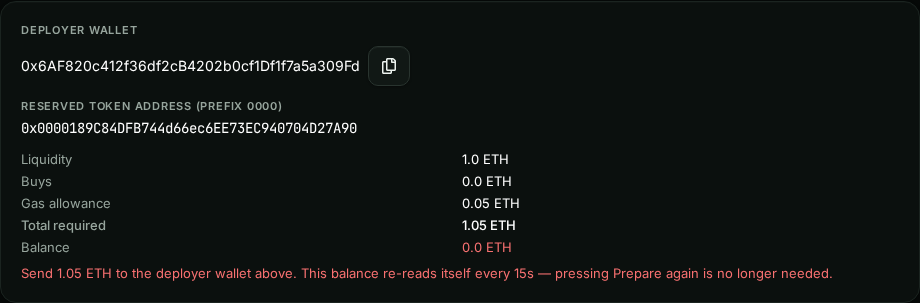
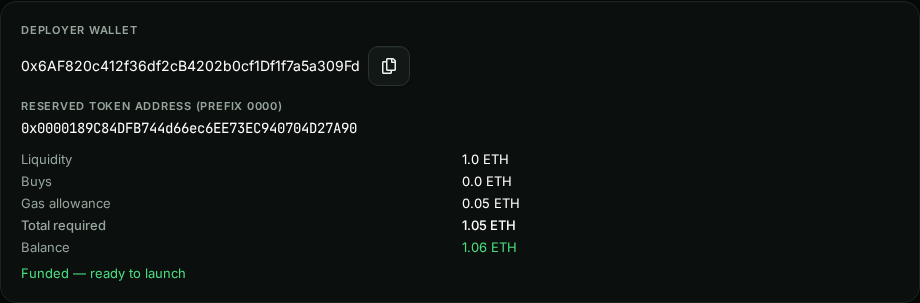
Fund thisThe deployer deploys the token and creates the pool. Send it the Total required on Robinhood Chain: liquidity ETH + a 0.05 ETH gas allowance (+ the DEX Screener fee if ticked).
- Buys show 0 ETH because the buy wallets are funded separately, below.
- The balance re-reads every 15 seconds; you don't need to press Prepare again.
- The reserved token address is where the token will be deployed.
Funding the buy wallets with USDT
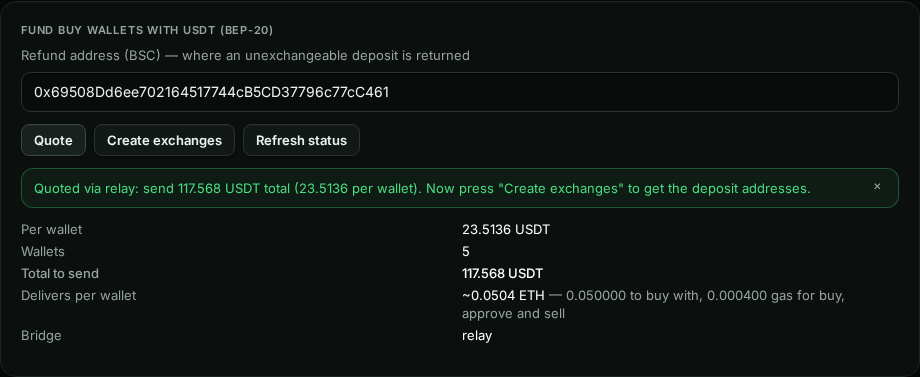
Pay each address separatelyThe buy wallets are filled from BEP-20 USDT on BSC through a bridge. Each wallet gets its ETH per wallet plus a small gas reserve (0.0004 ETH); the quote includes a 6% rate buffer.
- Enter a BSC refund address you control, press Quote, then Create exchanges.
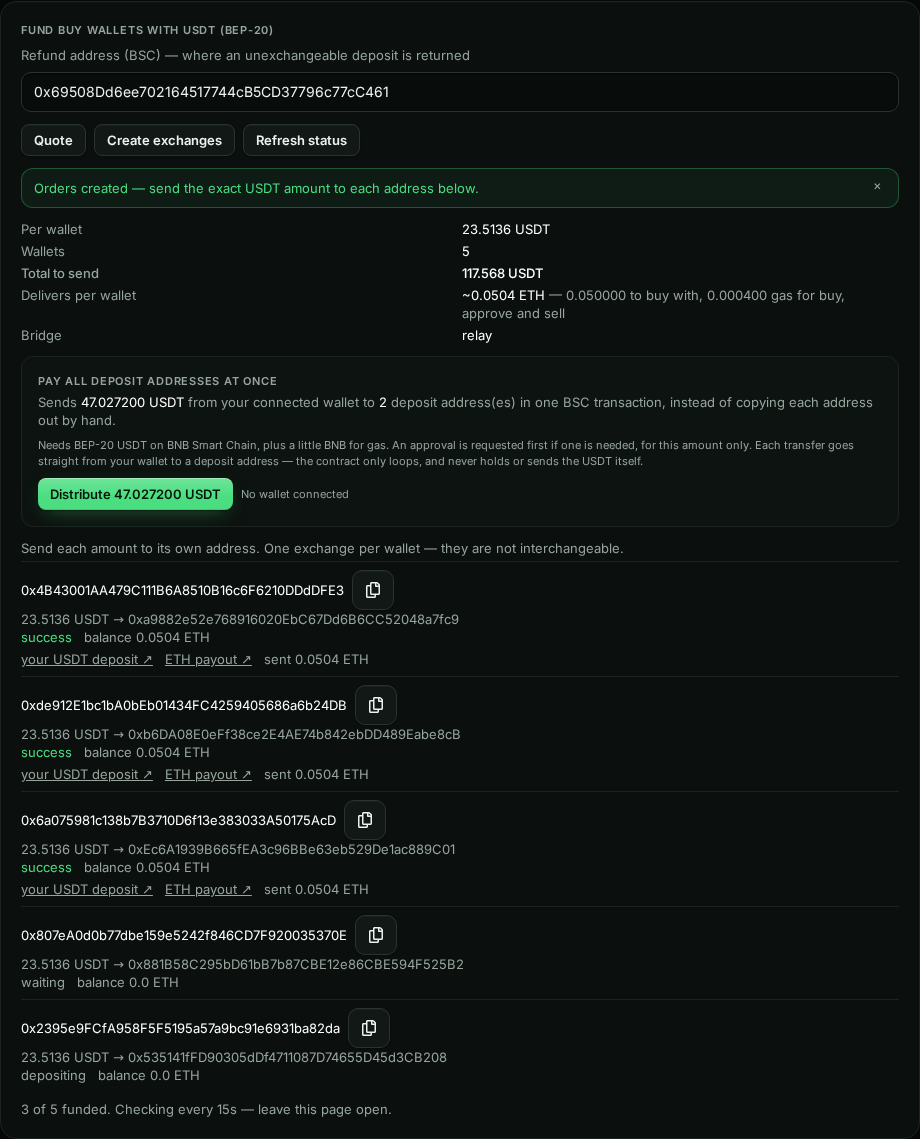
- Send the exact USDT amount to each deposit address. There is one per wallet, and they are not interchangeable.
- Or press Distribute N USDT to pay every unpaid address in one BSC transaction from a connected browser wallet holding the USDT and some BNB.
- Status refreshes every 15 seconds while the page is open.
- Creating exchanges again while some are live asks you to abandon the old ones. USDT sent to an abandoned address can't be recovered.

Launch
Enabled when fundedLaunch & Buy unlocks once the deployer holds the total required. Press it and leave the page open; progress updates every 1.5 seconds.
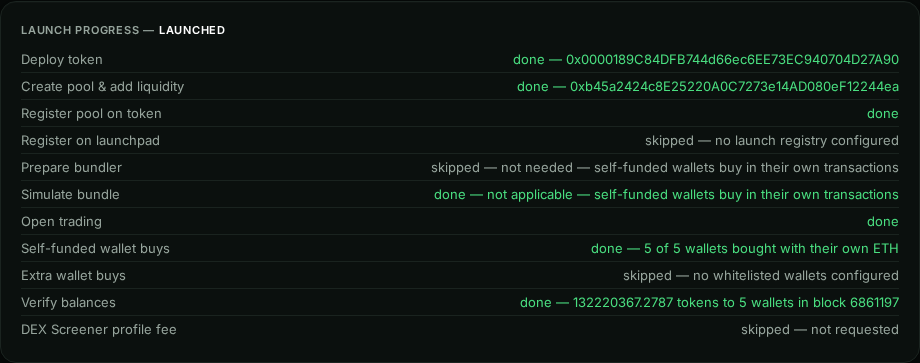
Launch progress
CompleteEach step shows its status and result. Done is green, failed is red, running is yellow.
- Open trading is the transaction that enables trading. With self-funded wallets, Prepare bundler is skipped and Simulate bundle says not applicable: each wallet then buys in its own transaction (Self-funded wallet buys).
- Verify balances totals the tokens that reached the buy wallets.
- If a step fails, the error is shown under the list and the launch can be retried.
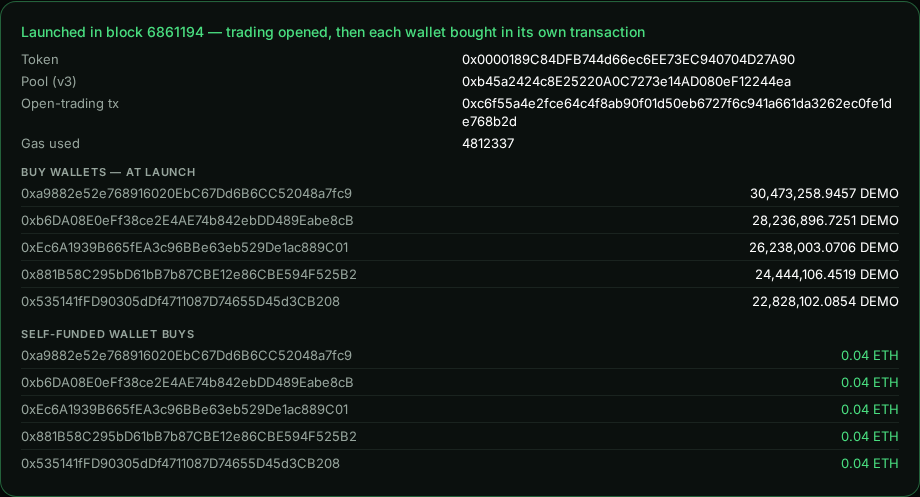
Result
Where the wallets are listedToken, pool, the open-trading transaction and gas, then each buy wallet with the tokens it received, and the ETH each self-funded wallet spent.
- The amounts were read at the Verify step and don't update later. Use the Buy or Sell page for live balances.
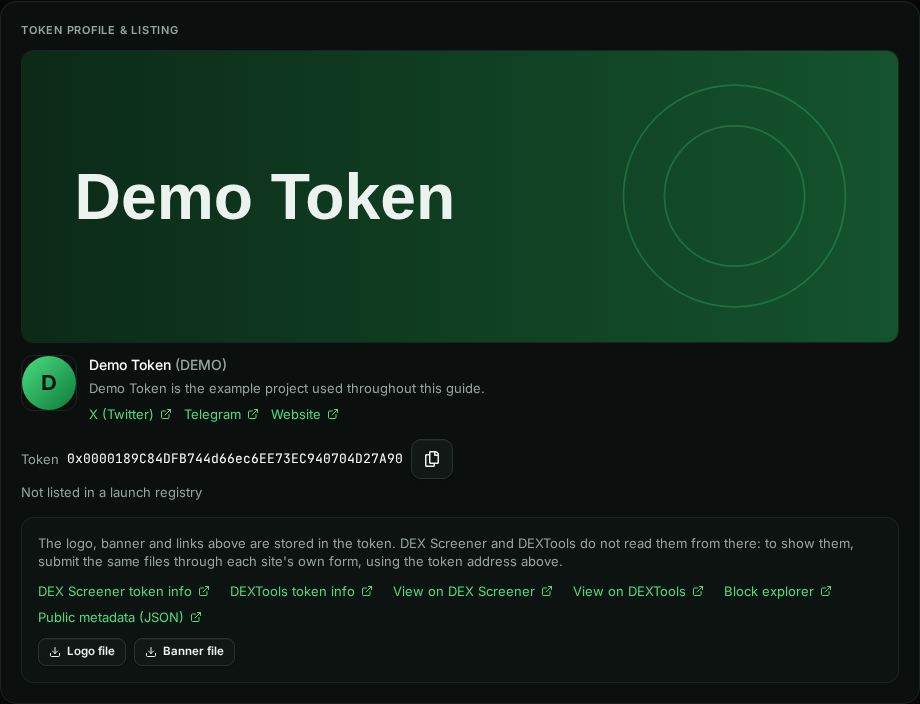
Token profile and listing
The profile as written into the token, with the links you need to get it shown elsewhere.
- DEX Screener token info and DEXTools token info open their submission forms; use Logo file and Banner file to download the images to upload there.
- Public metadata (JSON) is the profile served by blasthood.fun for this token.
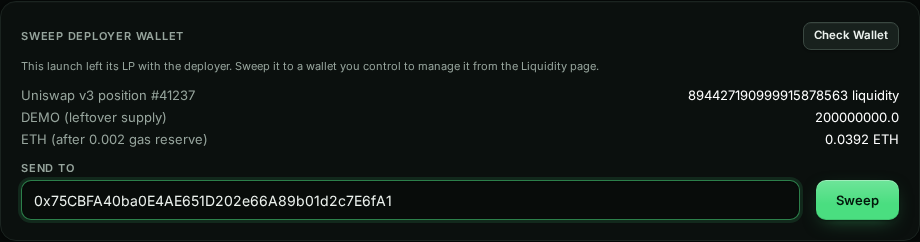
Sweep deployer wallet
Do this nextPress Check Wallet to see what the deployer still holds:
- the LP position (the v3 position NFT, or v2 LP tokens);
- the supply that didn't go into the pool (200M DEMO here);
- leftover ETH, minus a 0.002 ETH gas reserve.
Enter your own wallet under Send to and press Sweep. After that, manage the LP from Liquidity management.
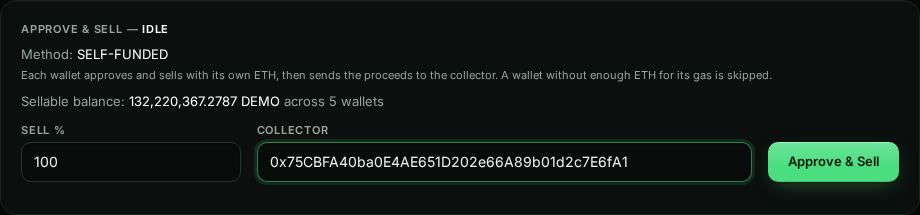
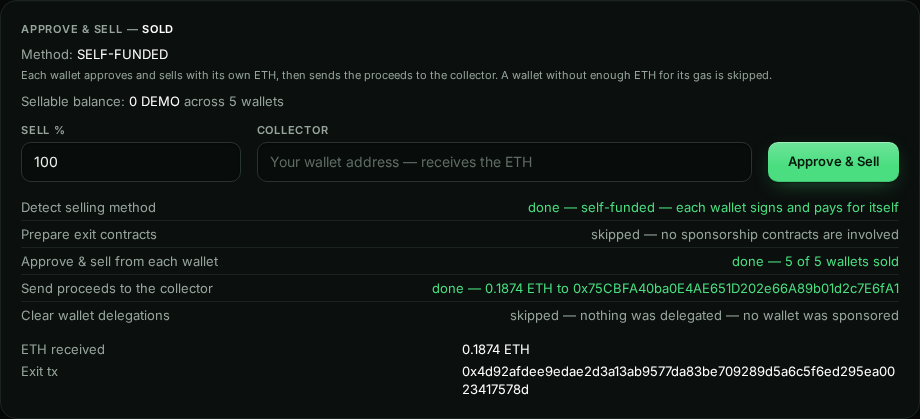
Approve & Sell
Collector requiredSells the given percentage of every buy wallet's tokens and sends the ETH to the collector.
- Sell % is 1–100 of each wallet's current balance.
- Collector is required: the wallet that receives the ETH. Use one you control.
- Each wallet approves and sells with its own ETH, then sends the proceeds on. A wallet that can't cover its gas keeps its tokens or ETH, and the steps say so.
- To sell only some wallets, or different percentages per wallet, use the Sell page instead.
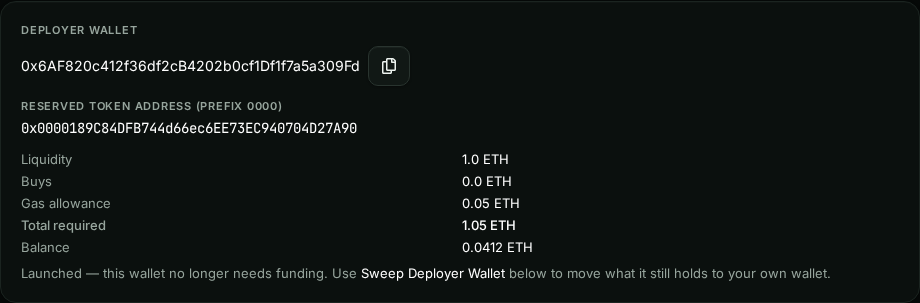
Deployer card after launch
DoneAfter launch the deployer only holds what's left. The card points you to the sweep instead of asking for funding.
- Prepare Launch and the USDT funding buttons are disabled for a launched project. To launch another token, create a new project.
Whole page after launch in one image (1600 × 5213)